When I was working on my MSc thesis—on a subject involving a lot of protein science—I wanted to be able to generate my own protein structure models from PDB format files that are available from the Protein Databank Archive. However I quickly discovered that the more capable programs either require users (even students) to purchase a license, or that most of the freely available programs are incapable of generating scalable, publication quality graphics.
During my searches I found two programs that I believed would be able to produce the high-quality images I wanted: CCP4 and POVScript+. Both programs are free to use, but whereas CCP4MG is available as a precompiled binary for macOS, POVScript+ is not. That means that you must build the POVScript+ tools from scratch. This is certainly not a trivial task for the casual computer user. But even users familiar with more hands-on operating systems—like Slackware Linux, or FreeBSD—may also encounter minor frustrating issues. So here I will explain how I got it all to work. I assume you have a basic understanding of the UNIX file structure, and that you understand at least the basics of using a terminal program to enter commands.
The first requirement is that you will need to have installed Xcode from Apple. This is a so-called SDK (Software Development Kit), and it is free to download from Apple’s website. [UPDATE: You can also install just the XCode “Command Line Tools” package, which will take up a lot less space on the hard drive.] Make sure that you have enough free space on your system, because it takes up over 10 Gigabytes after installation. And it is also worth mentioning that if you just installed Xcode—and thus have never used it—that you will not be able to compile anything at all. Try anyway and all you’ll get is an error message saying that the C compiler doesn’t work. Even though it’s brand new.
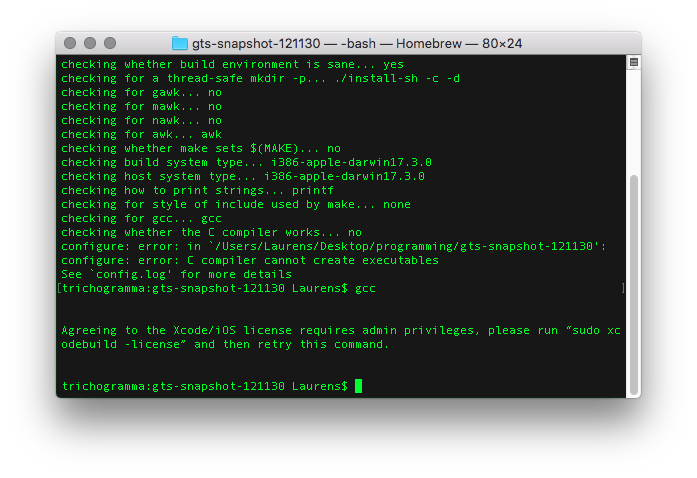
First run “sudo xcodebuild -license” and accept the damn license, then you’re good to go.
But the compiler works just fine of course. What that confusing error message is actually trying to communicate is that you first have to accept the license agreement from Apple before you can use Xcode. So all you do is first run gcc by itself and then Xcode will tell you what you need to do.
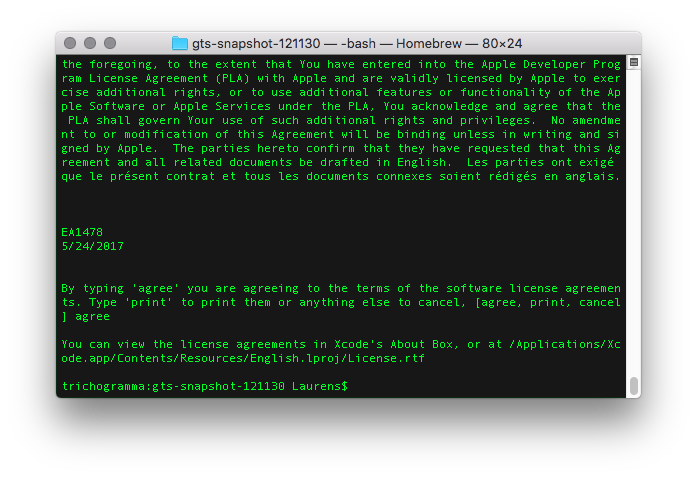
You want to be agreeable here.
Next you will need the GNOME libraries (called GLIB). Simply follow these instructions. First copy the shell script to wherever you want to build GLIB (using the “Save link as…” option) and then open a terminal, cd into that directory, and execute the script using the command “sh gtk-osx-build-setup.sh” (keep in mind that if you try executing the script directly with the command “./gtk-osx-build-setup.sh“, that you may first have to make the script executable by using the command “chmod u+x gtk-osx-build-setup.sh“). Then continue with jhbuild as instructed. It should start building everything automagically, though it may take a while for it to finish since it’s a relatively big build. It might be a good time to have a long coffee break.
Once GLIB is done, the other thing we need to have is the GTS Library. First download the source files here. Then execute the configure script, substituting the “/path/to/gtk” bit with the actual location of your gtk directory: “./configure –with-glib-prefix=/path/to/gtk/inst/lib PKG_CONFIG=/path/to/gtk/inst/bin/pkg-config“. Then run “make” followed by “make install“. Done. On to the final step.
Finally we have arrived at the last step, where we start building POVScript. First download the sources here, and after unpacking you change directory into the newly created povscript directory and execute “./configure –with-gif=no –with-jpeg-lib=/path/to/gtk/inst/lib –with-png=no –with-jpeg-inc=/path/to/gtk/inst/include“. Again you must substitute all paths with ones that are correct for your system. If this goes well, just execute “make” to build POVScript. Running “make install” doesn’t seem to work (at least on my system), so instead I just create two symbolic links in /usr/local/bin that point to the binaries molauto and molscript that are located in the /src subdirectory.
So now if you download protein 5EC5.PDB (in pdb format) from the Protein Databank Archive, you can use the following command “molauto /path/to/5ec5.pdb | molscript -ps -out /path/to/5EC5.ps” to create something awesome like this:
5EC5Hopefully you should now be able to create similar models. If you managed to get POVScript+ working, then you can finalize by deleting some stuff you don’t need. And there is a lot of stuff you don’t need! The whole GTS Library build directory with sources can be trashed since you already installed the libs on your system. And from the gtk directory (containing over 2 gigabytes of data!) you only need the subdirectory “.../gtk/inst“. Once you delete the source files, you will have reclaimed about 1.8 gigabytes of valuable memory space. And finally you can also delete Xcode—unless you plan to build more projects, of course.